Deck of Ricks — Functional Programming for UI engineers — part 1
Sergeant Colon was lost in admiration. He’d seen people bluff on a bad hand, but he’d never seen anyone bluff with no cards.
Few words before we start
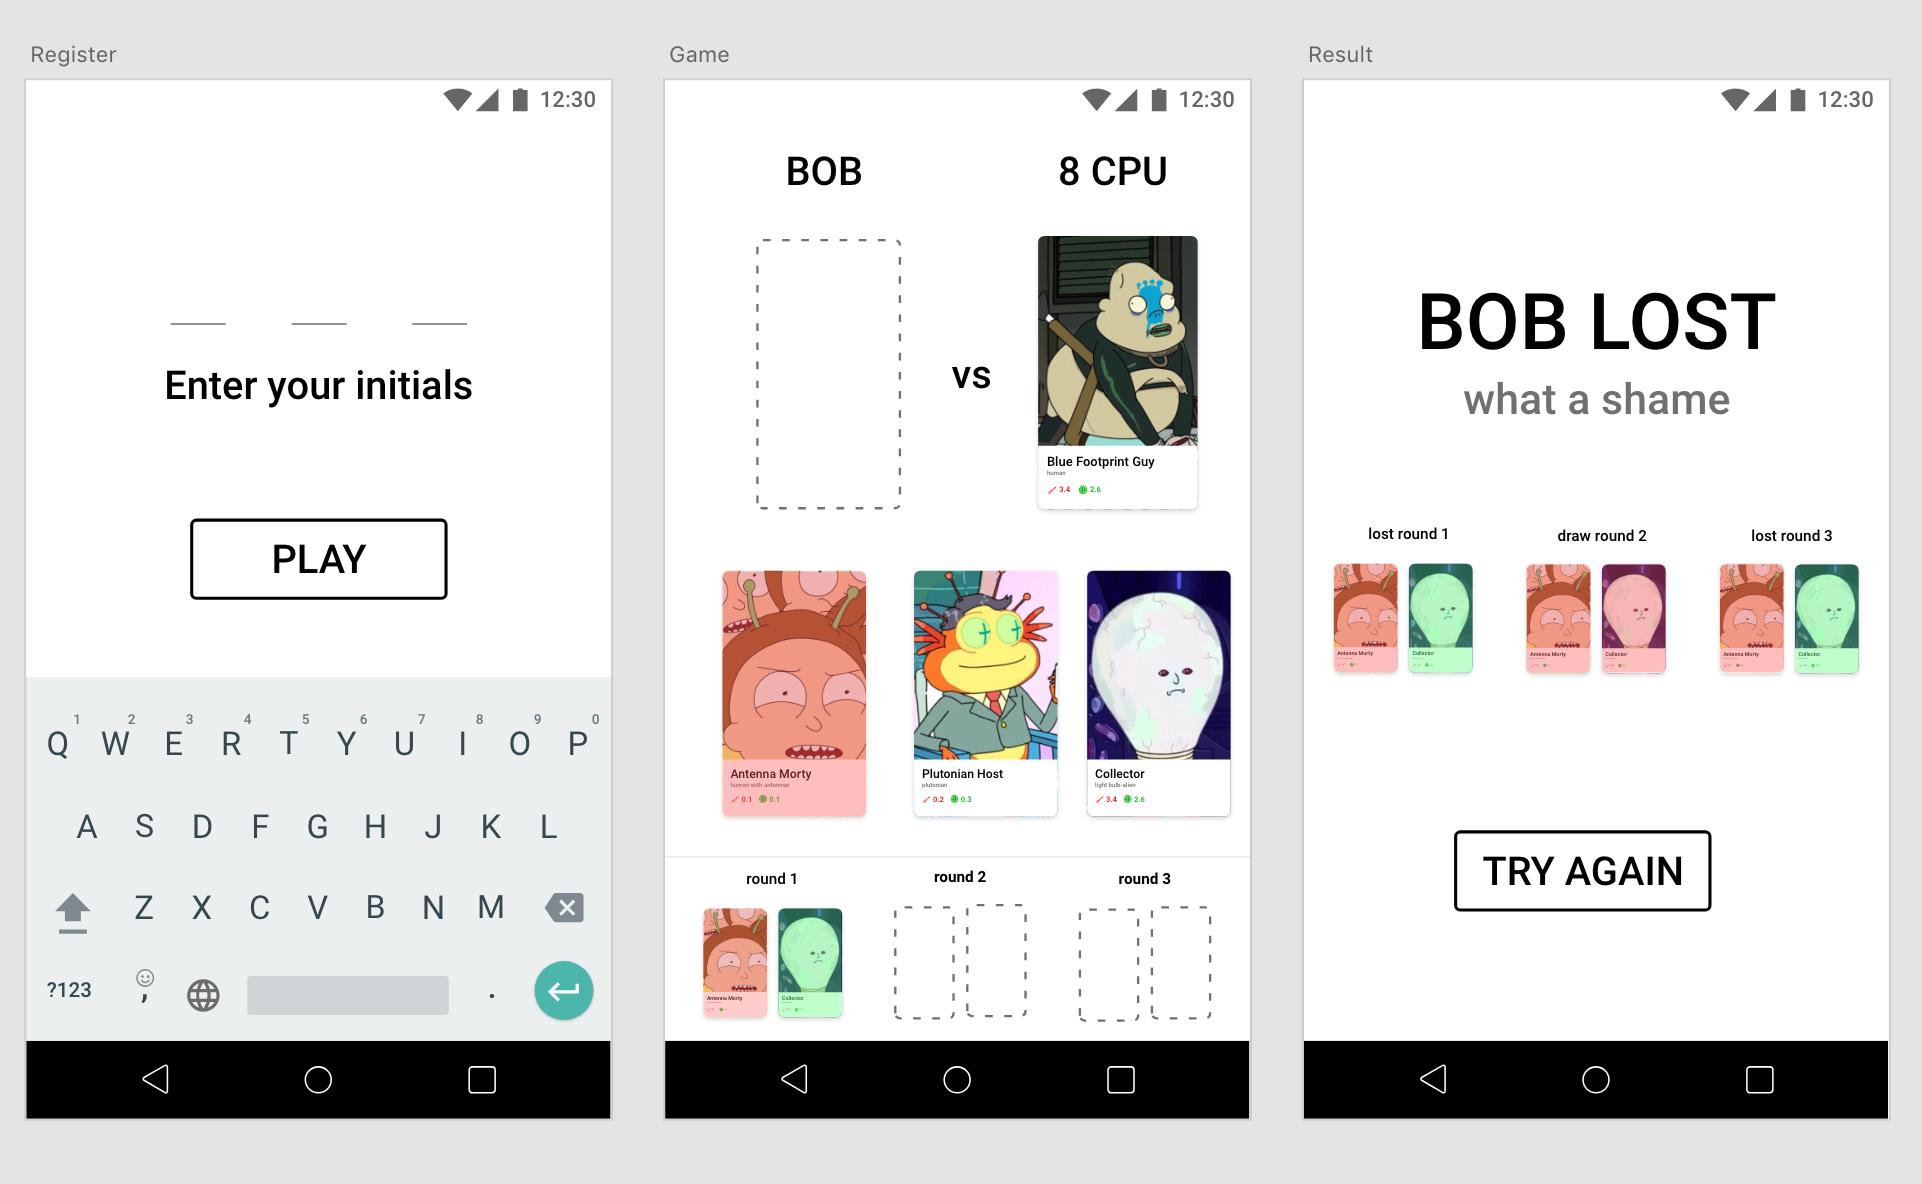
In the Deck of Ricks series we will learn functional programming for the ui by creating a indie card deck game for Android. This is what it will look like when complete:
If you start wondering why copying variables instead of changing them, or find some concepts alien, check out my post How to talk like a Functional Programmer. It is a short introduction to many of the terms and concepts that you will encounter bellow.
We are going to use one very small library called Elmo Elmo is a library and not a framework. In it’s core it contains 3 functions and 2 interfaces. While it constrains you to follow a specific pattern, it liberates you to implement it how you like. It is not invasive and it plays well with others.
P.S. I am the author of the library.
, which will give a little structure to our code. Elmo is based conceptually on React, Redux, Elm, Rx, but you don’t need to be familiar with any of them to start this tutorial.
Setting up the project
You can find the code at github
Clone the project and open it in android studio.
git clone https://github.com/bobymicroby/Ricks/The project commit history follows the blog post series closely. The first two commits contain the code for this chapter:
Reacting to events d66d1445
Initial a91ebf7f
If you want you can checkout Reacting to events
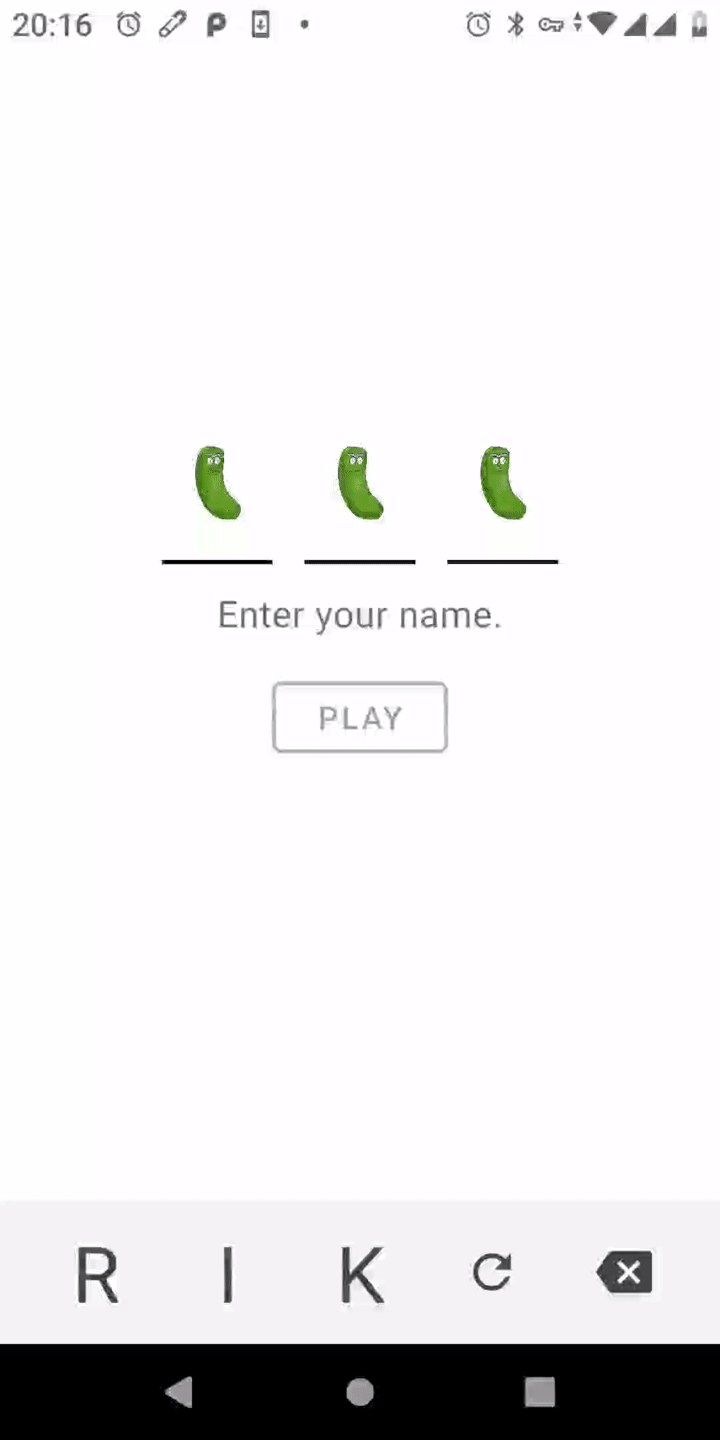
git checkout d66d1445and hit the play button in android studio to run the project. You should see the working registration screen of our game:
As you can see, there are a couple of improvements done during the implementation of the mocks:
- We have created our own three letter keyboardRick will definitely enjoy watching Morty trying to type in his initials on that thing.
- Sprinkled the UI with Pickle Ricks
So, let’s go back a bit, and checkout the Initial commit.
git checkout d66d1445You can now open IntroActivity.kt and start following the tutorial.
Modeling our screen
It all starts with imagining that all the keyboard buttons, initials and other moving parts of the screen are part of one data structure. We will call this structure the Model, and say that every property of this structure is bound to something currently shown on screen. If we change the model, we change the screen.
So let’s play the what-you-see-is-what-you-get game and try to create one:
data class Model(
    val initial0: Char?,
    val initial1: Char?,
    val initial2: Char?,
    val key0: Char,
    val key1: Char,
    val key2: Char,
    val canPlay: Boolean
)
So far we have a model with:
- three initials that may or may not be filledKotlin has support for nullable types, they are marked with
?at the end. Meaning some initials can benulland others can be some.
with characters - three characters each assigned to one of the keys of our three-letter-key keyboard
- flag indicating if the play button is enabled or not.
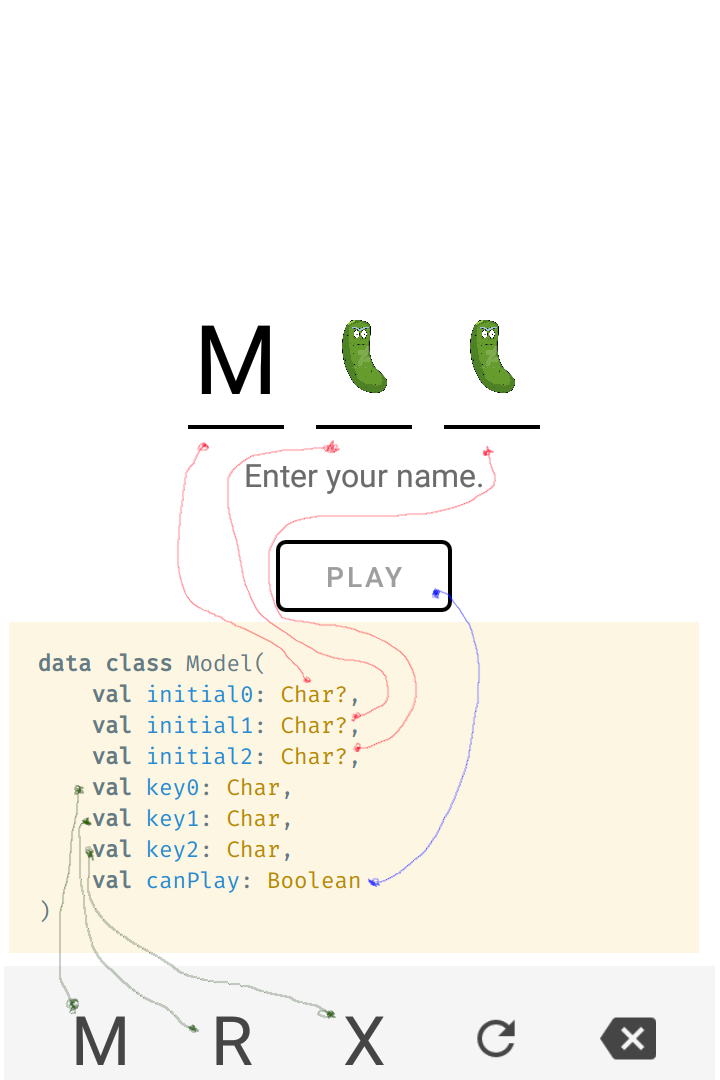
Q: What about the Pickle Ricks? I don’t see a property for them?
A: They are represented by the absence ? of value for each of the initials.
Q: And the refresh and backspace buttons ?
A: They are static views that are not bound to the model.
Drawing the model on screen
Views are responsible for drawing Models on screen. They are interfaces that have only one function called view . This function takes a Model and as a side effect draws it on the screen.
//            Implements Elmo's View interface ⤵
class IntroActivity : AppCompatActivity(), View<Model> {

    override fun onCreate(savedInstanceState: Bundle?) {
        super.onCreate(savedInstanceState)
        setContentView(R.layout.activity_intro)


        val initialState = Model(null, null, null, 'R', 'I', 'K', false)
        view(initialState)

    }

    override fun view(model: Model) {

        if (model.canPlay) {
            play_button.strokeColor = getColorStateList(this, R.color.black)
        } else {
            play_button.strokeColor = getColorStateList(this, R.color.dark_gray)
        }
        play_button.isEnabled = model.canPlay


        key_0.setChar(model.key0)
        key_1.setChar(model.key1)
        key_2.setChar(model.key2)

        pickle_0.isVisible = model.initial0 == null
        pickle_1.isVisible = model.initial1 == null
        pickle_2.isVisible = model.initial2 == null

        initial_0.setChar(model.initial0)
        initial_1.setChar(model.initial1)
        initial_2.setChar(model.initial2)
    }
}
By implementing the View interface our activity now has a view function that knows how draw our Model on screen. If you pass it the initialState variable and run the activity you should see:
View is drawing our first model 
The view function should be kept simple as possible. Avoid writing complex code inside and stick to binding properties from the model to your views.
Note about the rest of the tutorial
You can choose to implement the code for rest of the tutorial relying on the examples bellow, or you can move one commit ahead to Reacting to events, and use the examples as code reference.
git checkout d66d1445Reacting to events
We need a way to update our model by making it react to user input and other type of events. So, just like we have created our mental Model which represent what is drawn, let’s create another type capturing things we need to react upon. The type bellow is called Msg short for Message, but you are free to call it Action, Event or anything you like.
sealed class Msg {
    data class TapOnKey(val char: Char) : Msg()
    data class Refresh(val randomSeed:Long) : Msg()
    object Backspace : Msg()
}
Msg forms a sealed class hierarchy of your ownElmo is not forcing you to extend already predefined Message type as most frameworks. This is very simple and effective because it allows you to have as many separate
hierarchies as there are screens, ergo you can do exhaustive pattern matching, and have stricter,shorter and more easy to find message types.
, and by looking at the code it seems that there is:
- a message that represent a tap on one of the letter keys, carrying its value, called
TapOnKey - a message that represent request to generate three new random letters carrying a random seed value, called
Refresh - a object that represent a click on the
Backspacebutton
Updating the model
In order to react to incoming Msg and update the Model we will need the last component of our architecture - the UpdateIf you are familiar with Redux, this will be your Reducer
. Just like View it is a very simple interface containing just one function:
interface Update<Model, Message> {
    fun update(msg: Message, model: Model): Model
}
So, it looks like it takes a Message and a Model type and produces a new Model back. This function is going to be called every time a new message arrives and its result is going to be drawn on screen. The Update contains the so called business logic of the program.
So, let’s create an Update for our screen:
class Update : Update<Model, Msg> {

    private val charPool: CharRange = 'A'..'Z'

    override fun update(msg: Msg, model: Model): Model {
        return when (msg) {
            is Msg.TapOnKey -> {
                when {
                    model.initial0 == null -> model.copy(initial0 = msg.char)
                    model.initial1 == null -> model.copy(initial1 = msg.char)
                    model.initial2 == null -> model.copy(initial2 = msg.char, canPlay = true)
                    else -> model
                }
            }
            is Msg.Refresh -> {
                val random = Random(msg.randomSeed)
                model.copy(key0 = charPool.random(random), key1 = charPool.random(random), key2 = charPool.random(random))

            }
            Msg.Backspace -> {
                when {
                    model.initial2 != null -> model.copy(initial2 = null, canPlay = false)
                    model.initial1 != null -> model.copy(initial1 = null)
                    model.initial0 != null -> model.copy(initial0 = null)
                    else -> model
                }
            }
        }
    }
}
Functional Programming Rationale
The update function is easy to follow and write. You don’t need to read the branch handling Msg.Refresh in order to implement Msg.TapOnKey because the model is immutable , the messages are sealed and the message handling branches are isolated. This is very liberating because you have in scope only the current state and the incoming message and your only job is to return the new state based on that.
The update function must be kept pure,total and deterministic. If you don’t know what this means, check out my blog post How to talk like a Functional Programmer.
tl;dr :
- we do not update our model in place( we don’t use
var, we use copy instead) updatemust return the same value for the same input- later in the series we will see how to deal with side-effects and async network calls
Q:But WHY all the trouble ? Until now the tutorial was a walk in the park, and now things got a bit complicated?
A:Here are three immediate WINS:
- you can write simple tests ( you can stick to unit tests and not fire up emulators or use Roboelectric)
- you don’t have to think about multithreading - the
viewfunction is called on the main thread and theupdatefunction is called from what threads are available. - simple unidirectional mental model :
message -> model -> new model
More WINS will follow in part 2 of this series when we start dealing with network calls and async events. There Elmo will really start to show it’s true power and you will never regret investing your time in learning about purity, totality and determinism.
Hooking everything together
In order to start sending Msg from our UI we need a Sandbox object. The Sandbox binds all components together into a working program. Creating a sandbox is straightforward:
Sandbox.create(initialState, Update(), this)The sandbox needs :
- initial
Model, Updateinstance- class that implements the
Viewinterface
Once created the sandbox can accept messages and pass them to the Update . It will then push the model updates back to the view.
Once you done with the sandbox, make sure to disposeIt is very important to dispose the Sandbox. If you fail to do so you risk leaking references to your Activity, which can result in memory leaks.
it.
Bellow you can find the code creating, working with, and disposing the Sandbox:
class IntroActivity : AppCompatActivity(), View<Model> {

    private lateinit var sandbox: Sandbox<Msg>

    override fun onCreate(savedInstanceState: Bundle?) {
        super.onCreate(savedInstanceState)
        setContentView(R.layout.activity_intro)

        val initialState =  Model(null, null, null, 'R', 'I', 'K', false)

        sandbox = Sandbox.create(initialState, Update(), this)

        refresh.setOnClickListener {
            sandbox.accept(Msg.Refresh(Random.nextLong()))
        }
        backspace.setOnClickListener {
            sandbox.accept(Msg.Backspace)
        }
        key_0.setOnClickListener {
            sandbox.accept(Msg.TapOnKey(key_0.text[0]))
        }
        key_1.setOnClickListener {
            sandbox.accept(Msg.TapOnKey(key_1.text[0]))
        }
        key_2.setOnClickListener {
            sandbox.accept(Msg.TapOnKey(key_2.text[0]))
        }

    }

    override fun onDestroy() {
        super.onDestroy()
        sandbox.dispose()
    }

}
By now you should be able to interact with the UI and see how the Model, Update and the View work together, each with it’s specific responsibilities, towards a single goal - beautiful, tidy and performant code.
Bonus points
Losing the UI state still haunts many Android developers. When I started Android programming long time ago, I was stunned and utterly surprised when I rotated my phone and the orientation change destroyed everything on my screen. Let’s see how easily can we solve this problem using Elmo.
First let’s annotate our model with @Parcelize from Kotlin Android Extensions . This will generate Parcelable implementation which enables Android to save our model to disk
@Parcelize
data class Model(
    val initial0: Char?,
    val initial1: Char?,
    val initial2: Char?,
    val key0: Char,
    val key1: Char,
    val key2: Char,
    val canPlay: Boolean
) : Parcelable
Then store the last drawn model as a variable of the Activity
    private var lastModel: Model? = null

    override fun view(model: Model) {
        lastModel = model
Save the lastModel to disk when the orientation changes.
 override fun onSaveInstanceState(outState: Bundle) {
        super.onSaveInstanceState(outState)
        outState.putParcelable("lastModel", lastModel)
    }
And use it as initialState when creating your Activity
    override fun onCreate(savedInstanceState: Bundle?) {
        val initialState = savedInstanceState?.getParcelable("lastModel")
            ?: Model(null, null, null, 'R', 'I', 'K', false)

        sandbox = Sandbox.create(initialState, Update(), this)
And this is it, everything will be restored just as it was before with no hassle at all.
End of part 1
Congratulations for writing your first android UI using functional programming style! I am sure you will enjoy part 2 of the series even more! There we will unleash the true power of functional programming and see how to deal with side-effects, async network calls and concurrency with ease.